
首先给个github地址:https://github.com/react-community/react-native-image-picker 英文不行的看下面这个笔记
该插件可以同时给iOS和Android两个平台下使用,但是需要配置下各自平台下的文件
1. 首先,安装下该插件:
npm install react-native-image-picker@latest --save
2. 先别link,先添加进来该库之后 再link.
下面对于各自平台进行配置即可.
iOS:
手动添加库 :
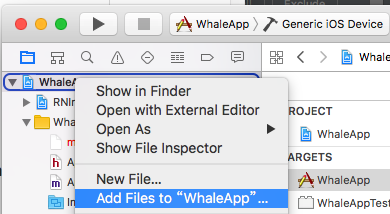
In the XCode's "Project navigator", right click on your project's Libraries folder ➜ Add Files to <...>
Go to node_modules ➜ react-native-image-picker ➜ ios ➜ select RNImagePicker.xcodeproj
=> 打开Xcode打开项目,点击根目录,右键选择 Add Files to 'XXX',选中项目中的该路径下的文件即可:node_modules ➜ react-native-image-picker ➜ ios ➜ select RNImagePicker.xcodeproj
OK,添加进来之后,再进行 link命令. react-native link react-native-image-picker
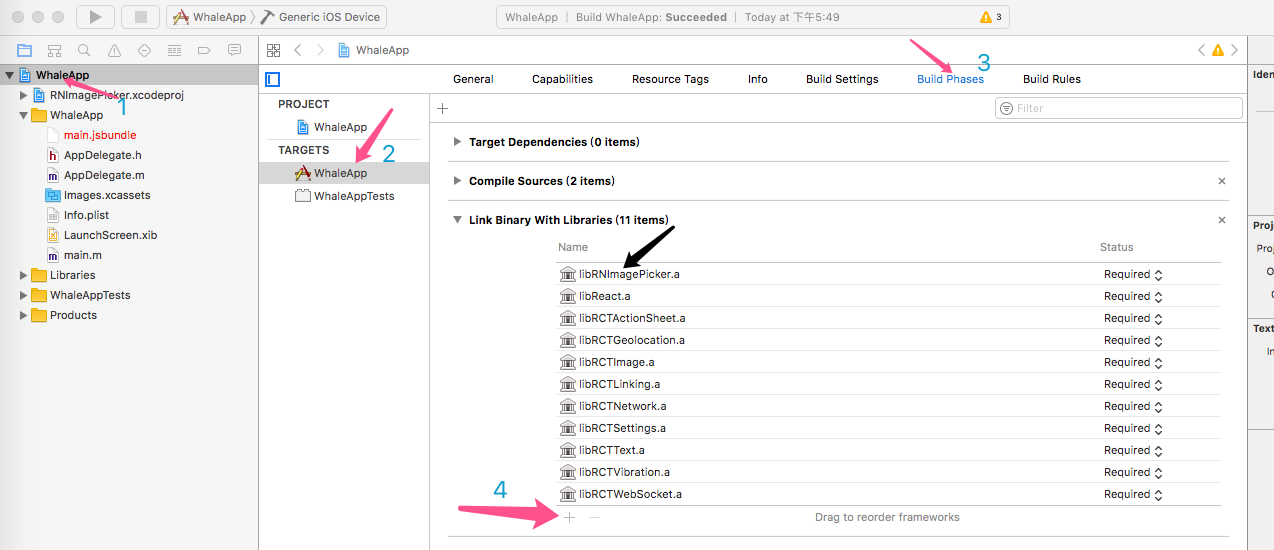
3.Add RNImagePicker.a to Build Phases -> Link Binary With Libraries
(注意这里的只要出现RNImagePicker.就可以了,跟前面的图标没关系)
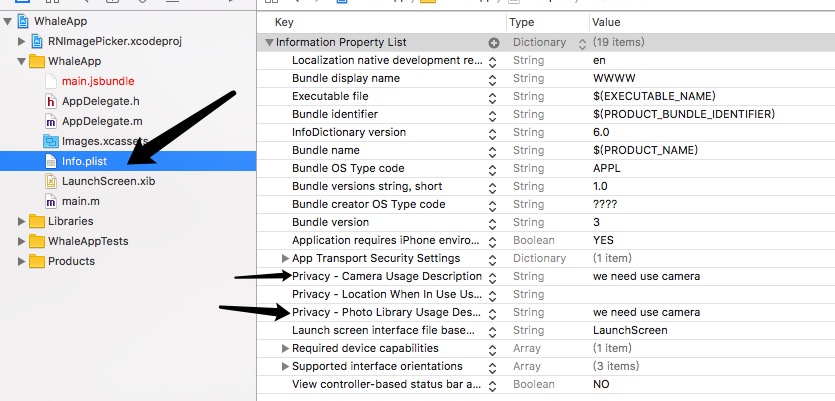
4.For iOS 10+, Add the NSPhotoLibraryUsageDescription and NSCameraUsageDescription keys to your Info.plist with strings describing why your app needs these permissions
=>对于适配iOS10,需要在info.plist中配置NSPhotoLibraryUsageDescription和NSCameraUsageDescription
(点击加号 选择privacy camera usage Description 和 privacy. PhotoLibraryUsageDescription )
iOS平台配置完毕.
Android:
1.Add the following lines to android/settings.gradle:
include ':react-native-image-picker'
project(':react-native-image-picker').projectDir = new File(settingsDir, '../node_modules/react-native-image-picker/android')

2.Add the compile line to the dependencies in android/app/build.gradle:
dependencies {
compile project(':react-native-image-picker')
}

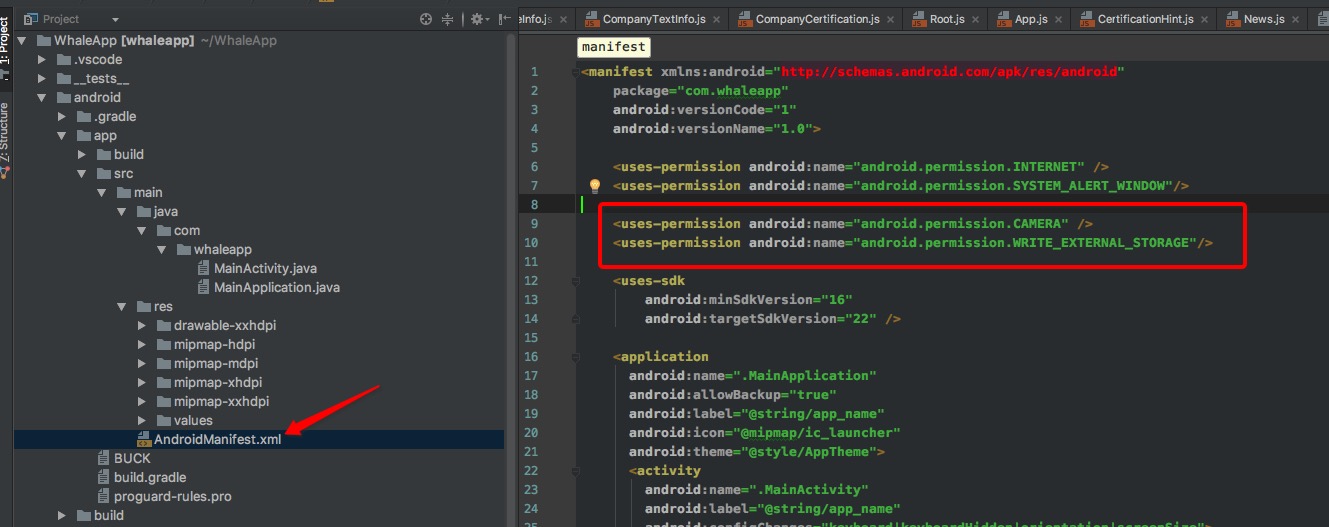
3.Add the required permissions in AndroidManifest.xml:
<uses-permission android:name="android.permission.CAMERA" />
<uses-permission android:name="android.permission.WRITE_EXTERNAL_STORAGE"/>
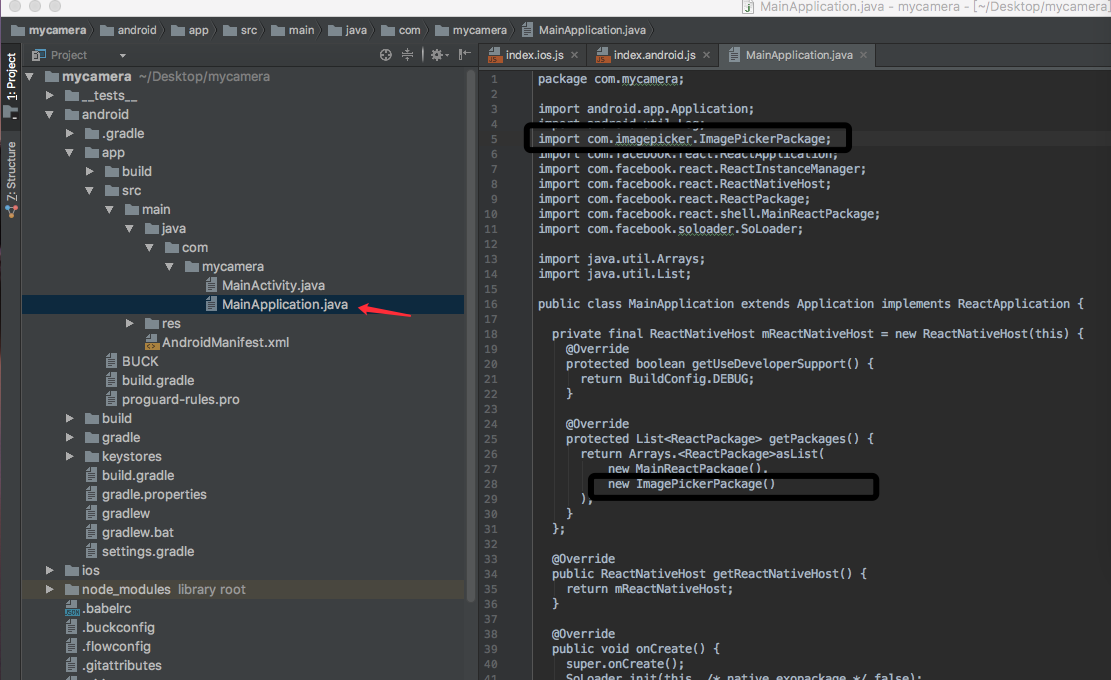
4.Add the import and link the package in MainApplication.java:
new ImagePickerPackage()
OK,安卓这边也配置完毕.
用法:
配置弹出框信息
import ImagePicker from 'react-native-image-picker'; //第三方相机
var photoOptions = {
//底部弹出框选项
title:'请选择',
cancelButtonTitle:'取消',
takePhotoButtonTitle:'拍照',
chooseFromLibraryButtonTitle:'选择相册',
quality:0.75,
allowsEditing:true,
noData:false,
storageOptions: {
skipBackup: true,
path:'images'
}
}
点击事件
cameraAction = () =>{
ImagePicker.showImagePicker(options, (response) => {
console.log('Response = ', response);
if (response.didCancel) {
console.log('User cancelled image picker');
}
else if (response.error) {
console.log('ImagePicker Error: ', response.error);
}
else if (response.customButton) {
console.log('User tapped custom button: ', response.customButton);
}
else {
let source = { uri: response.uri };
// You can also display the image using data:
// let source = { uri: 'data:image/jpeg;base64,' + response.data };
this.setState({
avatarSource: source
});
}
});
}
<Image source={this.state.avatarSource} style={styles.uploadAvatar} />
这里注意的是 ios的模拟器不能拍照哦